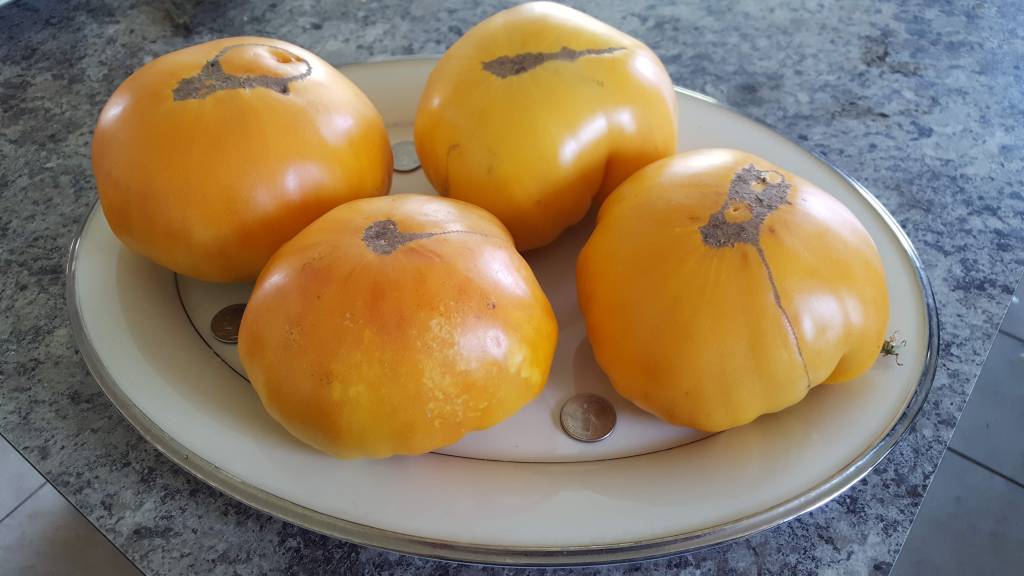
‘Kellogg’s Breakfast’ Tomato

I’ve grown heirloom tomatoes most of my life.  Now that I have a high tunnel, I’m not only looking for great taste, I’m looking for “well-adapted to life in a high tunnel.”  Kellogg’s Breakfast fits both requirements.

Taste

This is a large (1 to 2 pounds!) beautifully orange beefsteak tomato that tastes as good as it looks.  Although one of my chefs reports that she “never hides that color in a sandwich – the slice goes on the plate!” most reviewers slap a slice on their sandwiches for its nearly perfect sweet/acid balanced tomato flavor.

(Despite the name, ‘Kellogg’s Breakfast,’ I haven’t found anyone actually including the tomato as part of an Irish Breakfast, or any other breakfast dish. However, people do seem to love it in BLTs!)

Growing Characteristics

Kellogg’s Breakfast tomato is an indeterminate , regular leaf, large (need that leaf area to produce those beefsteak tomatoes!) plant which takes about 85 days to maturity. As beefsteaks go, it’s considered a mid-season producer with good yields that continue through the end of tomato season.

The stats are here.

High Tunnel Specifics

Plants are healthy and take trellising well. Disease resistance is good.

I was a little nervous about trellising a tomato plant whose fruits are 1 to 2 pounds each.  (The record is 2.7 pounds) However, those stems are strong!  Place a tomato trellis clip under the fruit bearing stem to support the tomato and in my experience, the stem holds onto that fruit! 

None of my fruits have developed green shoulders or suffered from sunscald.  The color is a deep, rich orange throughout the summer and into fall. (High tunnel tomato season ends at the beginning of October.) Yield (and quality) has been excellent throughout the season. Harvest before irrigating to prevent cracking.

Overall, Kellogg’s Breakfast plants thrive in the high tunnel. The tomatoes themselves look and taste great.  If you want beefsteaks in your high tunnel rotation, there’s no horticultural or flavor reason not to grow them.

History

Kellogg’s Breakfast doesn’t have the storied history of some traditional heirlooms (it was introduced to Seed Savers Exchange in 1993), but its flavor is so good that in the mid 2000s, it began winning nearly every tomato taste test/festival where it was entered which inspired heirloom seed houses to offer it, which encouraged tomato connoisseurs to grow it! 

The nitty-gritty particulars appear to be that Darrell Kellogg of Redford, MI, a railroad supervisor, found this tomato growing in his garden, liked it so much that he saved seed until it was stable, then gave seed to Bill Minkey of Darien, WI who introduced it to Seed Savers Exchange in 1993.  Bill then gave seed to Carolyn Male, who thought well of it and its popularity has continued to this day.  (Several sites have suggested that the original tomato was a West Virginia heirloom, but I have not been able to substantiate this claim.  DNA vegetable testing – it needs to be funded!)

Grow This Tomato In Your High Tunnel!

The quest to find heirloom tomatoes that do well in a high tunnel continues.  However, you can’t beat Kellogg’s Breakfast for flavor and adaptability to the high tunnel environment.  Yeah, it’s orange (bright orange!) and it can be a honking big tomato.  But it grows well enough that you can hand out samples and the taste will usually convince people to come back for more.

Philadelphia-style Pepperpot Soup

1.jpg


If you’ve lived in Philadelphia for awhile, you’ve heard of Pepperpot Soup which to be authentic, always contains tripe and not just any hot peppers, but ‘Ole Pepperpot’ hot peppers.

Since our grow-out of Ole Pepperpot  peppers was so successful, I figured we should also make its namesake soup.

As the peppers came from William Woys Weaver, it seemed only fitting that the recipe should, too.

“The Larder Invaded:  Reflections on Three Centuries of Philadelphia Food and Drink” was a joint library/historical society exhibit in Philadelphia presented in 1986 (ancient, pre-Internet history!) but its companion book, also by William Woys Weaver, 35 Receipts from The Larder Invaded, although out of print, can be read on Google Books and represents some of the most dedicated scholarship on historic Philadelphia cuisine.  In other words, the recipes have stood the test of time.

The explanation of Philadelphia-style Pepperpot Soup is here.  The recipe I used with my Ole Pepperpot peppers is here.

18th Century Philadelphians adored tripe.  This recipe takes 4 pounds of tripe and only 1.5 pounds of beef shin meat – and that’s for a recipe that is designed to feed an average family their dinner.

2.jpg

While the photo shows that I did find a 4 pound block of tripe, it was not easy.  Being in the Philadelphia region, everyone I called knew exactly what I wanted and why I wanted it “You’re making Pepperpot Soup, right?” were the first words people said when they heard my request for tripe, followed by “We don’t carry it.”

I finally found the tripe (and the shin bone) at Foresta’s Market in Phoenixville, an independent butcher shop where they not only have it, but it’s doesn’t have to be special ordered.  I was told to come in whenever I liked because “we always have it.”  Even 4 pounds worth.

Four pounds of tripe is pretty serious stuff and even more so when the recipe tells you that before you can make Pepperpot Soup, you have to poach the tripe.  All day.  And just at a bare simmer so that it doesn’t get tough.  Because it’s difficult enough to get 21st Century Americans to eat tripe, so who wants tough tripe?

3.jpg

So I let the water just barely tremble and poached the tripe.  Yes, it had a unique smell that the family did not find appealing!
Putting together the soup the next day was easy.  Once I had the ingredients together in the pot, I added fresh thyme from our herb garden and Ole Pepperpot peppers to simmer in the broth and add flavor.

4.jpg


In less than an hour, the soup was ready to eat.  Since we had so many Ole Pepperpot Peppers, I garnished each bowl with a nice looking one.

5.jpg

How was it?

If you like offal, especially with hot peppers, you’ll love this soup.  The tripe is tender, chewy and picks up the hot pepper’s fire.  The rest of the ingredients are fairly bland, so it’s all about the tripe and the Ole Pepperpot peppers.

I liked it, my other local friend who buys offal at the Phoenixville Farmer’s Market really liked it and no one else would give me an opinion (and didn’t ask for the extra quart I put in the freezer!).

If you grow the Ole Pepperpot peppers, it’s worth making Philadelphia-style Pepperpot Soup at least once to celebrate why this bountiful hot pepper is still with us.  But if afterwards, you’d rather just sprinkle the peppers on your regular home cuisine – well, we just won’t talk about that!

6.jpg


First Asparagus Harvest!

Today, after creating, planting and tending our asparagus field, here is our very first asparagus harvest!

1st%20harvest%20asparagus%20processed[1].jpg

We planted a half acre of Jersey Knight and Purple Passion asparagus in the Spring of 2013.  Like most perennials, asparagus can’t be harvested right away — it needs time to develop its root system.

That time was up this morning!  After walking the dogs and feeding the chickens, I grabbed my gear (pictured here) and went to the asparagus field.

Asparagus%20harvesting%20equipment%20April%202015[1].jpg

Gear included a food-safe produce tote with ice at the bottom and a linen dishtowel to keep the asparagus cool after harvesting, a sharp knife and a plastic 6 inch ruler from the Republican Committee of Chester County that two friends gave me at a Phoenixville street festival.  Asparagus should be harvested at 6 inches long (and as short as 4 inches on a warm day) so having a flexible, yet sturdy ruler to quick check spear lengths was very helpful.

Harvesting asparagus means walking down the rows and looking for spears that are at least 4 inches tall.  Right now, everything is harvested, regardless of diameter, so the plant roots will put energy into making more spears, rather than leafing out the spears it had already put up.

After an hour and a half, here was the harvest:

1st%20asparagus%20harvest%20basket[1].jpg

The Purple Passion are easier to see.  Here’s how they cleaned up:

1st%20harvest%20Purple%20Passion[1].jpg

For the next four weeks, I’ll be walking the asparagus field every morning to see if there are any spears ready to harvest.  There is nothing better than fresh asparagus — I had raw asparagus for lunch and Frank munched on steamed asparagus for dinner.

Asparagus can be purchased at the farm — just contact me for details.

Meanwhile, here’s a completely gratuitous photo of the magnolia tree at the corner of our property.  Spring is really here!

magnolia%20April%202015[1].jpg


Limited Edition Antique Black Walnut Cracker Works!

On Tuesday night, we tried out the “W. O. Weber Black Walnut Cracker.”  It looks like this:

full%20view%20walnut%20cracker[1].jpg

A senior citizen at our church heard that we were having difficulty cracking the black walnuts on the farm, so he offered to lend us this cracker.   His father, who worked on the railroad, bought it from the Webers who made them specifically for black walnuts.
These crackers were a popular item among the railroad workers, but a Google search didn’t find much about the Webers or the cracker.  I looked up the information on the cracker which you can see here:

serial%20number%20walnut%20cracker[1].jpg

Zillow says the address pictured still exists.  A “W. O. Weber & Sons” company in Pennsylvania, which used to be a machine shop, is still a registered business name here in PA.  But even though this is Serial No. 401, I didn’t find any other images of this cracker on Google.
Our biggest concern, however, was if it would crack black walnuts better than Frank’s vise, which is bolted to his workbench in the basement.  Tina bravely put a nut in the holder and cranked away, as Vir cheered her on from his chair:

Tina%20Vir%20walnut%20cracking[1].jpg

It works!  You need to pull the handle with some arm strength, but it crushes the shell around the nutmeat nicely and doesn’t take nearly the strength that the vise requires.  The cracker is also more portable than a vise.  You want a sturdy base under it (which is why we used the kitchen island instead of the kitchen table), but it produces cracked black walnuts with only moderate effort.  Every once in awhile, a nut explodes, so you want to put the cracker somewhere where the fragments can be easily found.
Tina managed to crack a container full of walnuts relatively quickly so that my cousin Ed, pick at the ready, had a pile of jumbled shell fragments and nutmeats to sort through.

Ed%20walnut%20cracking[1].jpg

With this device, we’ve got the cracking part of black walnut processing down.  Now, we need to develop a technique that separates the “break a tooth” hard shells from the “lots of great recipes for edible” nutmeats.  If you’ve got suggestions, put them in the comments.

We’ll be taking good care of the W.O. Weber Limited Edition Antique Black Walnut Cracker this November until the black walnuts are processed, then it will go back to its owner.  But we’ll definately be bribing him to borrow it for next year’s black walnut processing because it makes the cracking step that much easier.  If you’ve come here through Google Images because you found one of the other 400 of these devices,  hang on to it because it works and makes your black walnut life easier.

To finish, here’s another picture of Tina (with Vir still on his chair) strong-arming an especially tough nut (which she was able to crack without having to run downstairs to the vise!)

Tina%20Vir%20strong%20arm%20cracking[1].jpg

Bring on the black walnut recipes!  We’ve got the trees and now we’ve got a working cracker!


Ei von Phuket: A Top-Notch Cooking Tomato

When last we were talking about the Thai tomato, Ei von Phuket, it was Frank’s birthday and I was waiting for him to come home so he could taste this tomato we’re growing out for the Roughwood Seed Collection.

The verdict?  If you’re cooking with tomatoes, especially if you’re using the broiler, you want to use this tomato.

Who thought that a Thai tomato would be so amazing in bruschetta? Or that it transforms our weekday standby, frittata, into a dish we’re now serving to company?

(I’m sure this tomato is amazing in Thai food, but Frank is allergic to rice, so I don’t cook Thai at home.  [Have to make things that everyone can eat!]  If you do cook Thai cuisine at home and are growing this tomato, do try it out at the pale greenish-white unripe stage for curries as is done in Thailand — unlike Italian tomatoes, this tomato lingers in the “just before ripe” unripe stage so that you can easily harvest enough for curries and have ripe tomatoes to broil.)

Fresh, this tomato is okay, but nothing to write a blog post about.   Add heat and you’ll see why we’re so excited about this tomato.  Here’s how we’re eating/cooking with Ei von Phukets right now:

Saute:  It’s August and we have veggies, veggies, veggies.  I usually chop up what isn’t suitable for the farm stand and toss it in to the frying pan with some diced tomatoes so that I don’t need to use as much olive oil to keep the veggies from sticking to the pan.  In the past, I just used whatever tomatoes weren’t right for the farm stand either, but now, the flavor is definately enhanced when I use the Ei von Phukets.

Frittata:  With laying hens and lots of veggies, frittata is our go-to meal when things get busy.  Coat the frying pan with a good layer of spray oil. plop in whatever veggie mix is in the frig, stir in the eggs, turn on the heat to let it set and I was ready to go.  Then, since the Ei von Phukets were so good under the broiler for bruschetta, I thought, “Why not lay them on top of the frittata before it goes into the broiler?”  So, I halfed the Ei von Phukets, took out the seeds, then halfed the halfs and dropped them in a nice pattern in the top of the frittata while it was cooking on the stovetop.  I then grated some cheese (I like Pecorino Romano) over the tomatoes and put the whole thing under the broiler.

When it comes out, it looks like this:

EVP%20frittata[1].jpg

It looks nice (which is always a struggle for me) and it tastes fabulous!
So for 2015, it’s Zhong Shu #6 for fresh eating, Rei Umberto for sauce and Ei von Phuket for cooking (especially broiling).
Happy Tomato Season and if you’d like to try any of these tomatoes, drop me a line!


Gooseberries

In her later years, Frank’s mother grew gooseberries.  She wasn’t so sure that she liked them, so she’d pass them along to us and I’d make pies and fruit crisps from them.

Once we came to the farm, I had space to grow small fruits.  At a 2013 perennial plant swap, someone brought two ‘Pixwell’ gooseberry plants.  No one else wanted them, so I managed to score both of them when my numbers came up.

‘Pixwell” is the traditional American variety used in the unripe state to make pies and jam.  It looks like this on the plant:

gooseberries%20on%20plant[1].jpg

Contrary to what most of the plant sale sites say, ‘Pixwell” has some NASTY thorns.  Harvesting from any gooseberry plant is a careful business.

“Pixwell’ may be the old standard, but it has not held up well in the small fruit press.  The variety is almost universally panned as “overly sour” and “tasteless” by garden writers.  Lee Reich, the upstate New York fruit expert (if you like fruit and he’s speaking, you want to attend his lectures!) outlines how to grow gooseberries here and like most fruit folks, vastly prefers the newer-to-the-US Finnish and Ukrainian varieties which are mildew-resistant (the biggest disease problem in gooseberries) and sweet enough to eat out of hand when ripe in late June.

The trend is to use the American varieties (like ‘Pixwell’) unripe for pies and jam and to let the European varieties ripen to eat fresh as “dessert gooseberries.”

All fine and good, but how “ripe” should an “unripe’ gooseberry be to make pies?

We have 4 American gooseberry bushes.  Since Memorial Day, I was getting a steady stream of emails, asking to buy our gooseberries.

Unfortunately, my mother-in-law is no longer with us, so I couldn’t ask her when she had harvested her gooseberries.  It’s considered bad form to experiement on your customers.  So, to answer the question “When is an unripe gooseberry ripe enough for pie?” I would have to make an actual gooseberry pie.

Sometimes farm work is so tough!

So, I went out and harvested the Pixwells.  They looked like this:

harvested%20gooseberries[1].jpg

Gooseberries must be “topped and tailed” before they are cooked.  It’s time consuming to take the stem off the top end and the blossom-end “tail” which is another reason why some people just don’t want to bother with them.  As you can see from the photo, these gooseberries are in their light green “unripe” state.  ‘Pixwell’ gooseberries will turn light pink when ripe; other varieties will turn pink, purple or yellow, depending on the type.

Next, I needed a good pie recipe.

The currently popular gooseberry varities may be from Nordic and Eastern Europe, but the pies and jams made in the US are usually from British recipes.  When I need a traditional English recipe, I check out the BBC, which once again, did not disappoint.  Their gooseberry pie recipe is here.  What was fun about the BBC’s recipe is that it took port. However, I needed a little more instruction.  The Beekmans saved me with a great recipe here.

Both the BBC and the Beekmans agreed that gooseberries should be cooked before putting in the pie shell.  The filling ingredients are put in a saucepan and simmered until the goosberries “pop” which really does happen in under 10 minutes as shown in this photo:

hot%20gooseberry%20filling[1].jpg

While the filling cools, one pre-bakes the pie’s bottom crust.  Once the bottom crust and the filling are cool, one pours the filling into the bottom pie crust, then puts rounds (Beekmans) or strips (other recipes) of pie crust on top of the filling.  One then bakes the pie with a cookie sheet under it to catch drips (which will happen even with lots of space between the pie crust rounds or strips to let the steam out.  This is one goopy filling!
If one is the Beekmans, one’s pie looks perfect regardless (the advantange of staff!).  If one is me, who is a grower, rather than a baker, one’s pie looks a bit gloppy.  But to show you that everyone here really liked it, here’s a half-finished plate:

gooseberry%20pie%20remains[1].jpg

So, how ripe should an unripe gooseberry be for pie?  Personally, I love tart flavors, so I thought the pie was great.  But Cornell Univeristy’s write-up on gooseberries here suggests mid-June for making pies.  I think another 10 days on the plant will benefit the gooseberry flavor.

So, if you’d like to buy gooseberries for pies or jams, contact me June 18!  They should be perfect then!


Purple Top White Globe Turnip Photos

Today, I finished my portion of the 2014 Seed Savers Exchange M-GEN turnip trial.  We’ve had some January-like weather in November, but all the turnips took the deep cold without damage.  If I was planning to keep them in the ground through the cold, I’d mulch heavily with straw, but so far, they have held up without the mulch so I could complete the trial.

Purple Top White Globe Turnips are easy to find both at the farmers’ market or on the web.  Most growers that grow turnips grow this variety; therefore, it was the “control” in this trial to compare the other turnips against.

In my opinion, this was a productive, but not as flavorful variety as the others in the trial.  It had the same sharpness as the Purple Top Strap Leaf turnip, but not that turnip’s sulfur flavor (which, if you are eating turnips on their own, could be a good thing).  Surprisingly, the combination of sharp and sulfur made the Purple Top Strap Leaf turnip both greens and roots a superior addition to recipes that featured turnips and other strong tastes (for instance, ham hocks and turnip greens and roots were amazing with the Purple Top Strap Leaf turnips which were so strong on their own, I initially hestiated to add them to other recipes. I’m glad I went ahead and did that)

Personally, my favorite in the trial was the Snowball turnip.  It was a pleasure to grow, the greens were tasty and the mild turnips were excellent alone or in recipes.

My least favorite was this control, the Purple Top White Globe.  It was easy to grow and easily was the largest of the turnips, but it hung out in the middle on flavor — too sharp to eat alone as mashed turnips, like the Snowball and not enough of the sharp/sulfur combo like the Purple Top Strap Leaf to really make turnip recipes pop.

Regardless, here are the photos.  First, the roots:

Purple%20Top%20White%20Globe%20roots[1].jpg

Here are the greens — which filled my Dutch Oven, but cooked down to 1/3 of the space:

Purple%20Top%20White%20Globe%20leaves[1].jpg

And here are the greens and roots of the plants, straight out of the ground:

Purple%20Top%20White%20Globe%20roots%20and%20leaves[1].jpg

If you’re new to turnips, Purple Top White Globe is worth getting your practice in on.  It’s a decent turnip that will produce well for you with little effort and can take some surprise freezes when winter comes early.  But once you’ve learned to grow turnips. I’d suggest you move on to the other heirlooms — they just taste better!


Snowball Turnip Photos

Today, I took the measurements on the Snowball turnips for the Seed Savers Exchange M-GEN turnip trial.

I have grown Snowball turnips before and liked them.  For the trial, I noticed that they have very high quality greens, besides having a sweet, round root.  Several heirloom seed companies offer the seed so if you want to try the variety, it’s not difficult to find.

I cooked the greens and will be freezing them to make this dip for Christmas.  It’s a family tradition to try out new recipes at Christmas — my brother used to save recipes from The Food Network and then make them all for Christmas when he had time to cook.  He would make anything that struck his fancy — I tend to cook based on what I’ve grown in the past year.

Here are the famous white roots of Snowball turnips:

Snowball%20turnip%20cut%20roots[1].jpg

Here are the greens before I cooked them:

Snowball%20turnip%20greens[1].jpg

Here are the whole turnips out of the ground:

Snowball%20turnips%20greens%20and%20roots[1].jpg

If you want to grow turnips, I recommend this variety!


Black Walnut Cookies and Recipe

The whole reason we’re experimenting with black walnuts this year is that Tina had the following hand-written recipe for “Grandmother’s Ice Box Cookies” that she always wanted to try, but every time she looked at a bag of black walnut pieces in the store, she got sticker shock and didn’t make the cookies.
Here is the front of the recipe card.  We aren’t sure who “Grandmother” is as this card is old (probably from the 1950s with the mention of Crisco) and the recipes have been handed back and forth between Tina’s family for many years, but the family has felt the recipes were worth making and saving, even though they aren’t sure who developed them.

black%20walnut%20cookie%20recipe%20page%201[1].jpgHere is the back of the card:

black%20walnut%20cookie%20recipe%20page%202[1].jpg

And here are the finished cookies!  Tina says they are worth all the work to process the black walnuts, but we’ll see next Tuesday when we take another “crack” at it!

Tina%20black%20walnut%20cookies[1].jpg